Creating your own ERC20 Token on the MOAC blockchain
Before you read this page, you should:
- Understand the following general concepts: blockchain, smart contracts, ERC20 tokens;
- Be able to write a basic Ethereum smart contract in Solidity (see tutorial example);
After you read this page, you will be able to:
- Write your own ERC20 token contract;
- Compile and deploy it on the MOAC blockchain;
- Use the ERC20 token;
Write the ERC20 token smart contract
The ERC20 standard is developed by the Ethereum community.
contract ERC20Token {
  string  public name;
  string  public symbol;
  uint    public decimals;
  uint256 public totalSupply;

  function balanceOf(address _owner) public constant returns (uint256 balance);
  function transfer(address _to, uint256 _value) public returns (bool success);
  function transferFrom(address _from, address _to, uint256 _value) public returns (bool success);
  function approve(address _spender, uint256 _value) public returns (bool success);
  function allowance(address _owner, address _spender) public constant returns (uint256 remaining);
  event Transfer(address indexed _from, address indexed _to, uint256 _value);
  event Approval(address indexed _owner, address indexed _spender, uint256 _value);
}
User can develop its own ERC20 token. For that, we can either use a ready open source library to help with the task, or write the needed smart contracts directly from scratch. We will show both methods below so you can master your ERC20 token development skills.
Using a ready open source library
Let’s see how you can implement this interface by taking advantage of the OpenZeppelin Solidity library, for instance. We will write a TestCoin based on, for example, the PausableToken contract in OpenZeppelin:
pragma solidity ^0.4.18;

import "zeppelin-solidity/contracts/token/PausableToken.sol";

contract TestCoin is PausableToken {
  string public name = "Test";
  string public symbol = "TEST";
  uint public decimals = 6;
  uint public INITIAL_SUPPLY = 100000000 * (10 ** decimals);

  function TestCoin() public {
    totalSupply = INITIAL_SUPPLY;
    balances[msg.sender] = INITIAL_SUPPLY;
  }
}
To understand better all the steps that the inheritance from PausableToken has achieved in making our TestCoin a useful ERC20-compliant token (and why it can be helpful to start from an open source library like OpenZeppelin), you can follow closely the code of each of the library’s files that were imported after each inheritance and import is fully expanded.
For that, browsing the OpenZeppelin ERC20 token github repo will be very helpful: our TestCoin is inheriting from PausableToken, which itself inherits from StandardToken, which inherits from BasicToken and ERC20, and so on all the way to ERC20Basic and the SafeMath library import.
Developing your smart contract directly
Another way of doing this is to simply write the ERC20 interface and your contract implementing it directly from scratch. As you’ll see, this is actually a fairly straightforward task:
pragma solidity ^0.4.16;

contract ERC20Token {
  uint256 public totalSupply;

  function balanceOf(address _owner) public constant returns (uint256 balance);
  function transfer(address _to, uint256 _value) public returns (bool success);
  function transferFrom(address _from, address _to, uint256 _value) public returns (bool success);

  function approve(address _spender, uint256 _value) public returns (bool success);

  function allowance(address _owner, address _spender) public constant returns (uint256 remaining);

  event Transfer(address indexed _from, address indexed _to, uint256 _value);
  event Approval(address indexed _owner, address indexed _spender, uint256 _value);
}

contract TestToken is ERC20Token {

  string  public name = "Test Coin";
  string  public symbol = "TEST";
  uint8   public decimals = 6;
  uint256 public INITIAL_SUPPLY = 100000000 * (10 ** uint256(decimals));

  mapping (address => uint256) balances;
  mapping (address => mapping (address => uint256)) allowed;

  function TestToken() {
    totalSupply = INITIAL_SUPPLY;
    balances[msg.sender] = INITIAL_SUPPLY;
  }

  function transfer(address _to, uint256 _value) public returns (bool success) {
    require(balances[msg.sender] >= _value && balances[_to] + _value > balances[_to]);
    require(_to != 0x0);
    balances[msg.sender] -= _value;
    balances[_to] += _value;
    emit Transfer(msg.sender, _to, _value);
    return true;
  }

  function transferFrom(address _from, address _to, uint256 _value) public returns (bool success) {
    require(balances[_from] >= _value && allowed[_from][msg.sender] >= _value);
    balances[_to] += _value;
    balances[_from] -= _value;
    allowed[_from][msg.sender] -= _value;
    emit Transfer(_from, _to, _value);
    return true;
  }

  function balanceOf(address _owner) public constant returns (uint256 balance) {
    return balances[_owner];
  }

  function approve(address _spender, uint256 _value) public returns (bool success) {
    allowed[msg.sender][_spender] = _value;
    emit Approval(msg.sender, _spender, _value);
    return true;
  }

  function allowance(address _owner, address _spender) public constant returns (uint256 remaining) {
    return allowed[_owner][_spender];
  }
}
Make sure to save your TestToken contract to a file on your computer (e.g. TestToken.sol).
Compile and deploy ERC20 token smart contract
As a next step, you’ll need to generate the bytecode and ABI for your new smart contract. You can think of the bytecode as basically your contract’s compiled code. The ABI (Application Binary Interface) is a JavaScript Object that defines how to interact with your smart contract.
We will show three ways of achieving this as well - using MOAC wallet, Remix web IDE for Solidity development, or compiling using the solc compiler on your machine (i.e. the command line).
Using MOAC wallet
MOAC wallet is an online free, client-side interface for using MOAC wallets, make transactions and deploy contract. It was developed based on open-source software. To use the service, you need to run a local MOAC node with addition command line arguments:
--rpccorsdomain "http://wallet.moac.io"
This will allow the access of MOAC node using MOAC wallet.
Otherwise you will see the following error message:
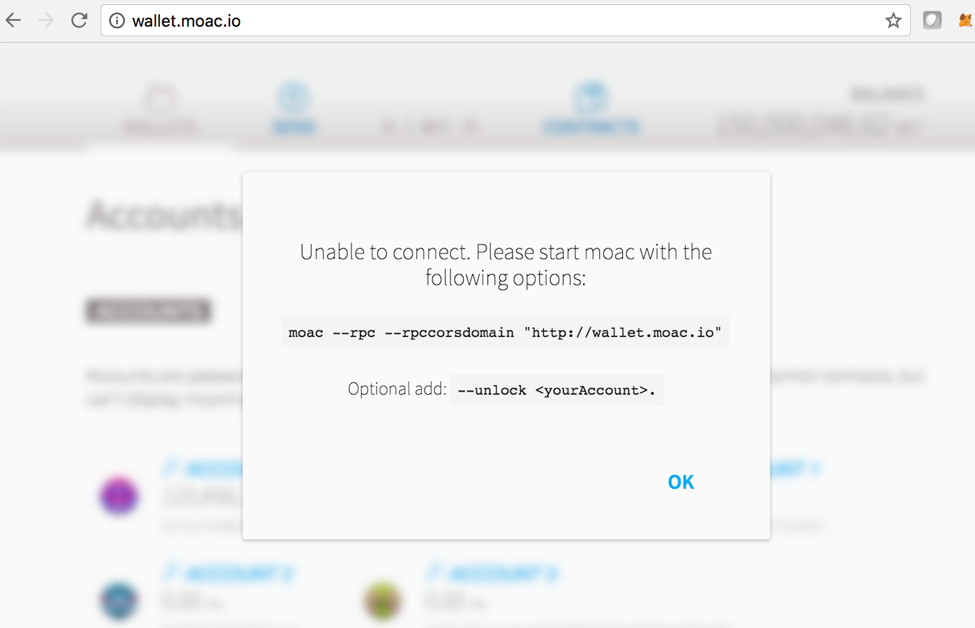
ERC20_moacwallet01.png
Example command to start a MOAC node connecting with mainnet:
moac --rpccorsdomain "http://wallet.moac.io" --rpc --rpcport "8545" --rpcapi "chain3,mc,net,db"
A successful interface connecting to mainnet looks like this:
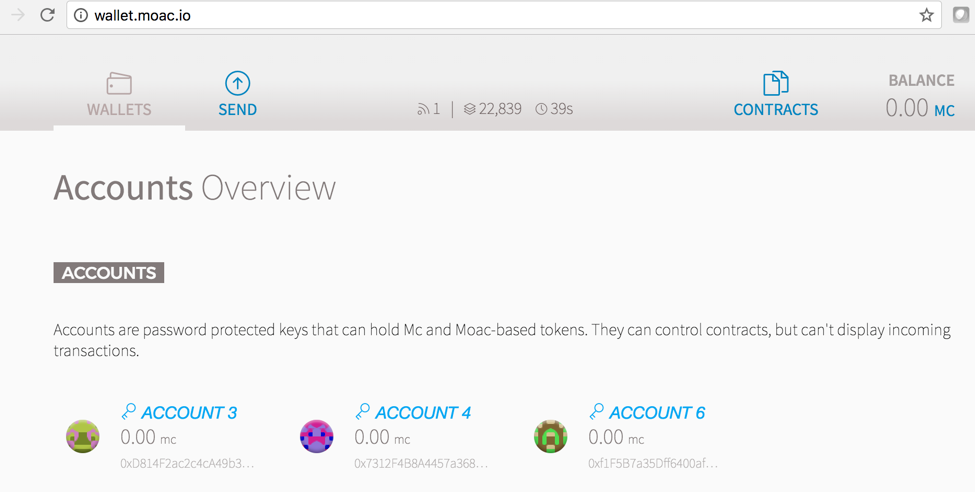
ERC20_moacwallet02.png
To compile the contract, click the “CONTRACTS” icon:
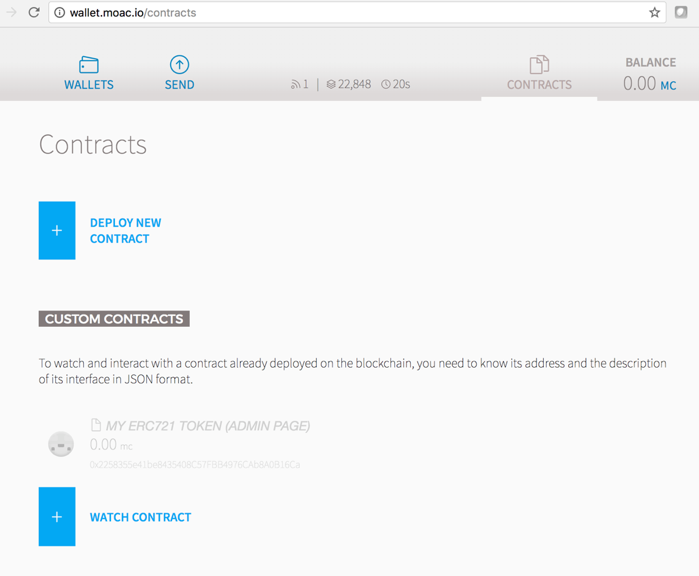
ERC20_moacwallet03.png
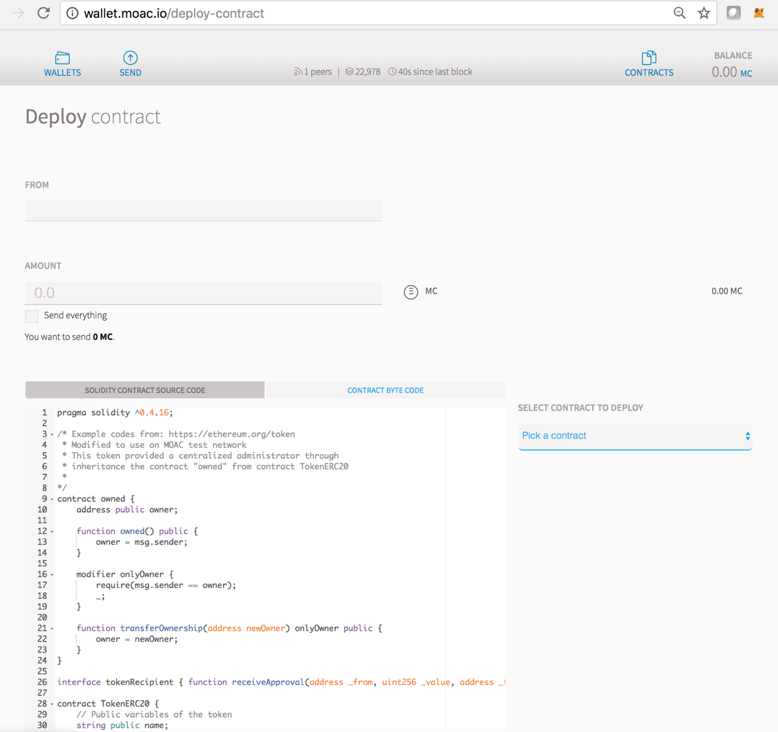
Then enter the contract deploy page:
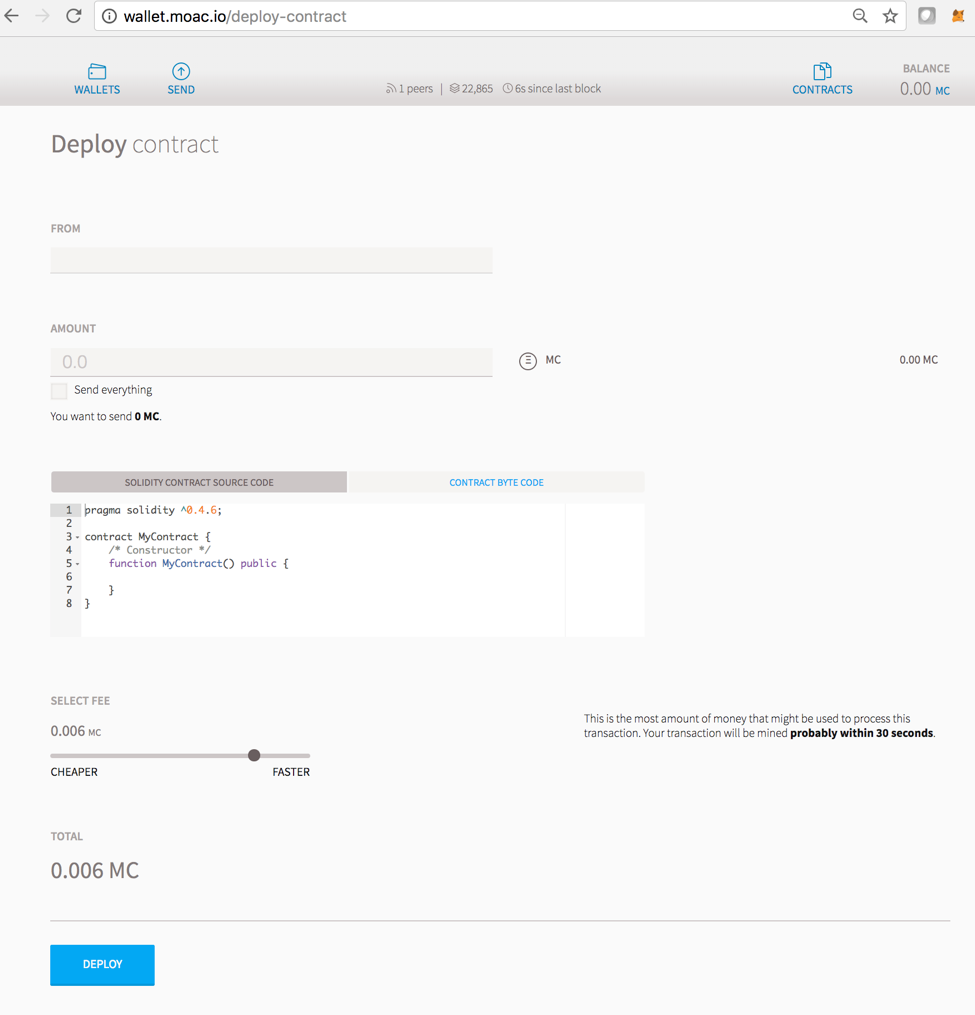
ERC20_moacwallet04.png
Copy the source code and paste in the “SOLIDITY CONTRACT SOURCE CODE” section. After copying the source code, the compiling process will automatically started. If no errors are not found, the right side should show a “SELECT CONTRACT TO DEPLOY” menu.
ERC20_moacwallet05.png
Select the contract name “TokenERC20”:
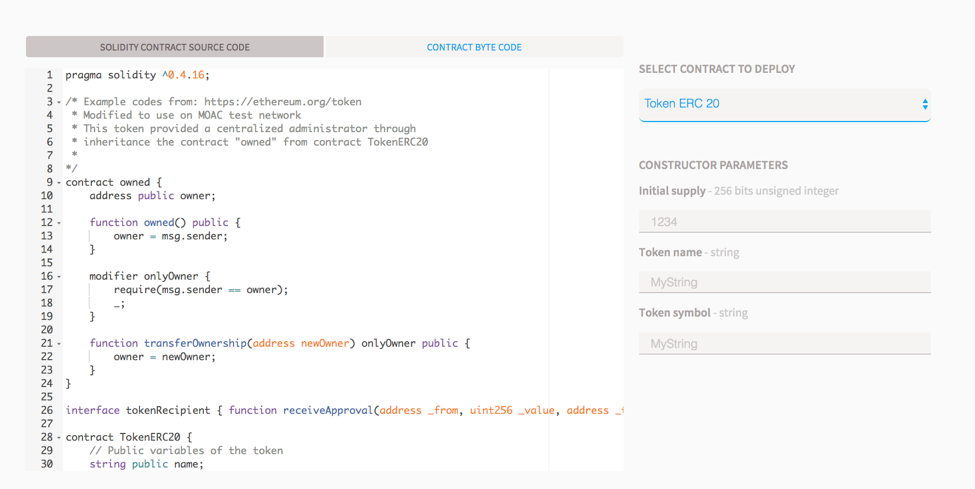
ERC20_moacwallet06.png
Input the parameters values from the menu:
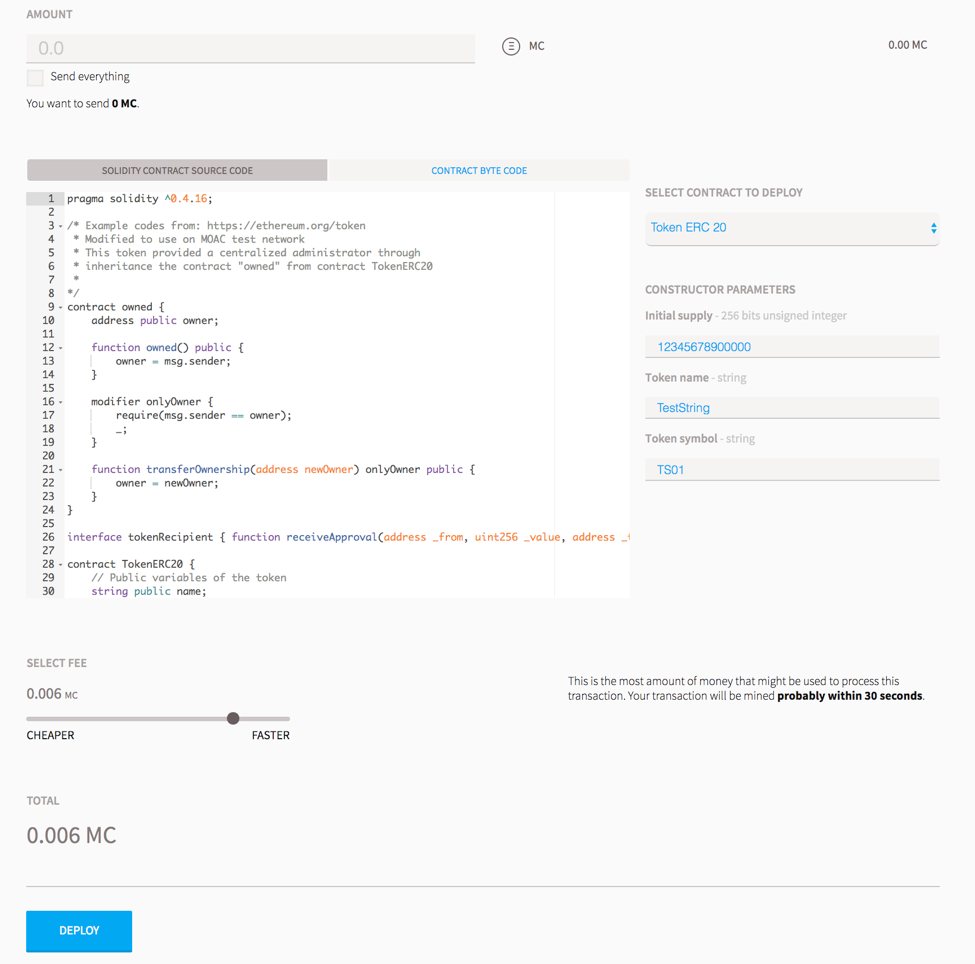
ERC20_moacwallet07.png
You need to have enough balance to deploy the contract. You can choose the amount of fee to use when deploying the contract. Click the DEPLOY button:
ERC20_moacwallet08.png
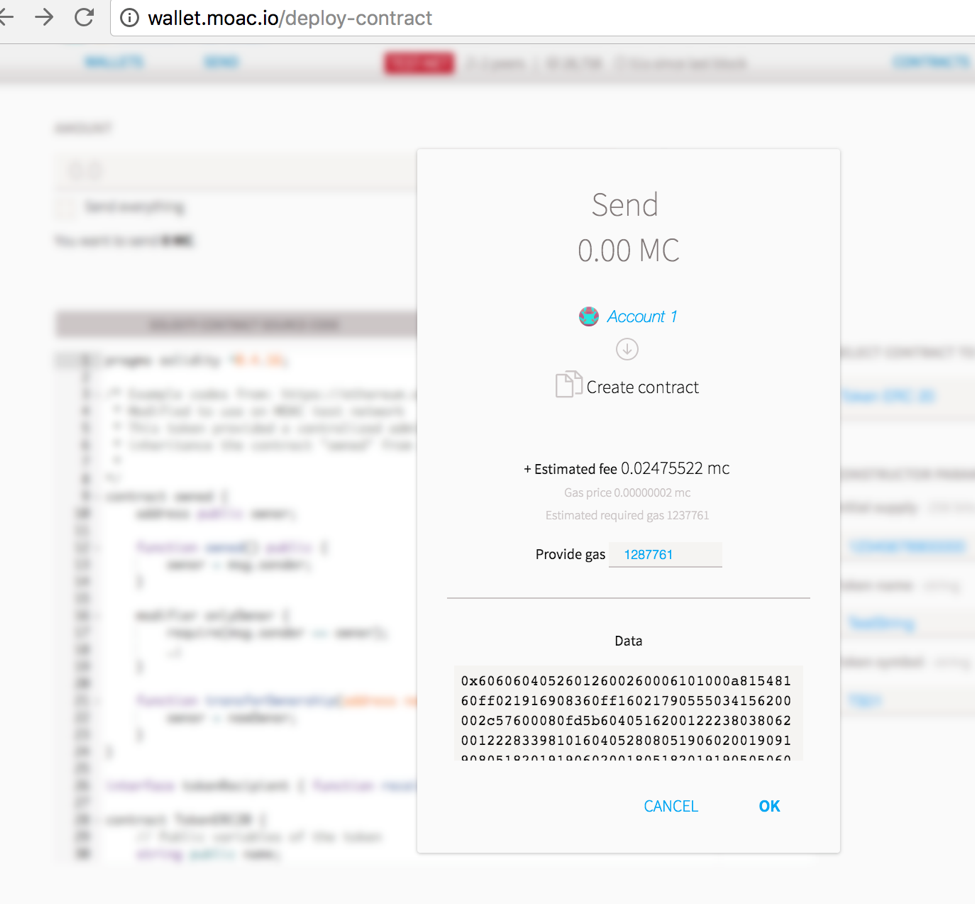
This is the contract ready to send from Account 1. The Provide gas is estimated by the compiler and we suggest you use it or put a larger number. If gas is not enough, the contract cannot be created. To continue, be sure to unlock the account to create the contract. You can use a console attached to the MOAC to do this:
ERC20_moacwallet09.png
After deploying, the interface is returned to the main menu and you can see the following transaction is creating.

ERC20_moacwallet10.png
After 12 confirmations, you can start using the contract by click the admin page link.

ERC20_moacwallet11.png
MOAC wallet is good for beginners that only need basic contract development needs. It cannot debug contracts. To advanced developers, you can use Remix to work with contracts.
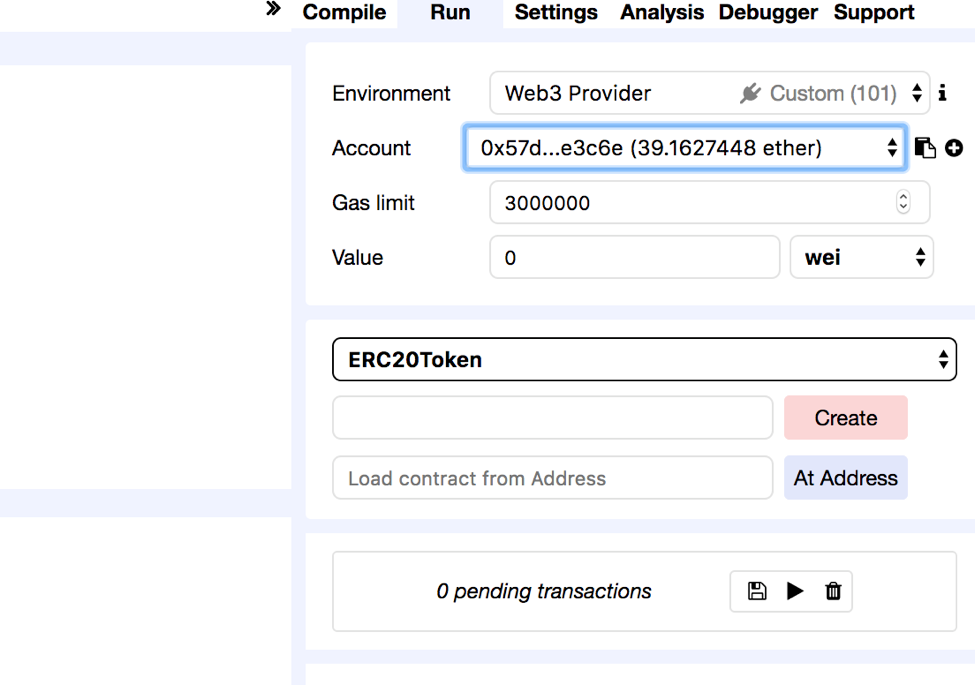
Remix
Remix is an online tool developed by Ethereum community to work with smart contracts. MOAC also supports the deploy of smart contract through Remix.
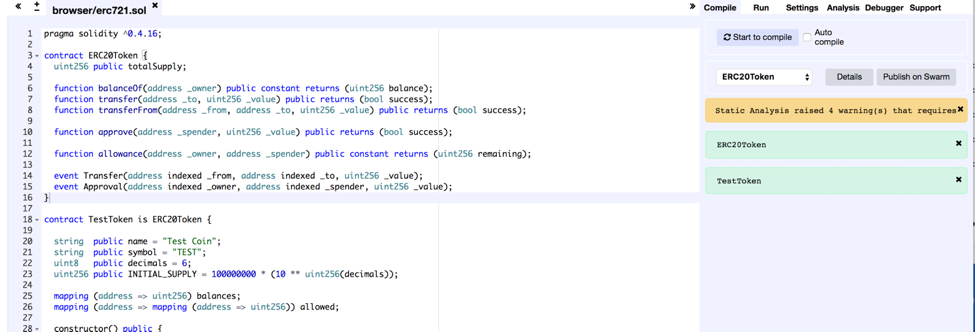
Open Remix on your browser, create a new file called ‘TestToken.sol’ and copy paste the code of your smart contract. Make sure you are including all the other Solidity files that your code is referencing with imports, especially if you are using the open source library approach.
Select ‘TestToken’ in the Compile window then click “Start to Compile” and the Details button next to TestToken. Upon scrolling in the popup details window for TestToken, you should be able to see similar sections to this Remix screenshot for the bytecode and ABI of your smart contract:
If the contract is compiled successfully, remix will show the interface like this:
ERC20_moacwallet12.png
To deploy the contract, you need to connect REMIX to a local or remote MOAC node. In addition to other arguments, be sure to enable the access of REMIX to the MOAC node with
moac --rpccorsdomain "http://remix.ethereum.org" --rpc --rpcport "8545" --rpcapi "chain3,mc,net,db"
Click the Run Tab and you should see the following menu:
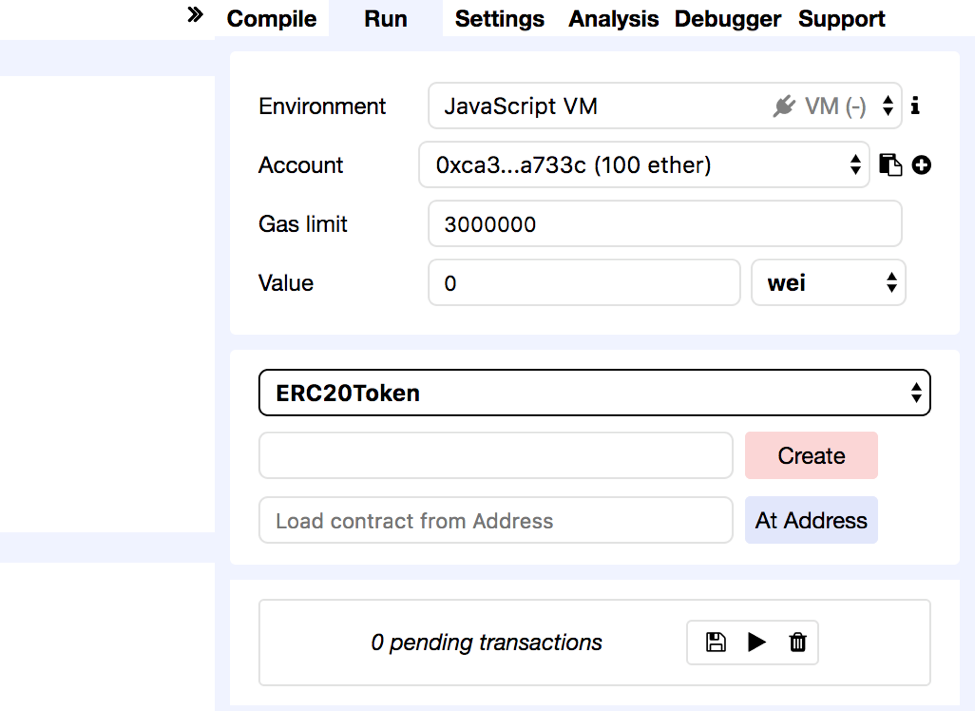
ERC20_moacwallet13.png
Choose the Environment menu: JavaScript VM is a simulated environment of Remix, it can be use to debugging the contract without actually deploying the contract to a real network. Injected Web3 is the default web3 connecting to Ethereum network. To deploy MOAC contract, you need to choose Web3 Provider.
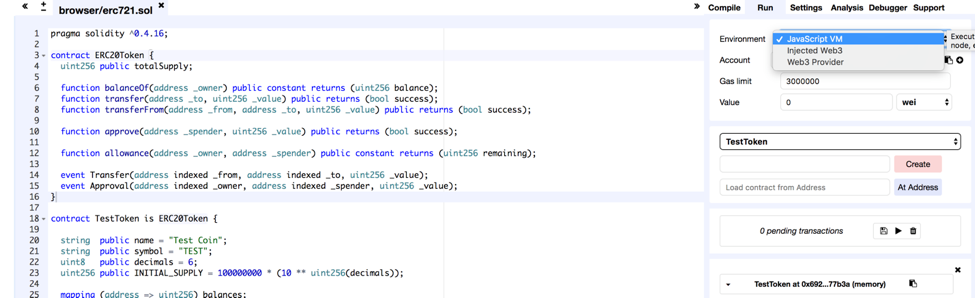
ERC20_moacwallet14.png
After choose “Web3 Provider”, you can see a message like this:
Click “OK”,

ERC20_moacwallet15.png
You need to make sure the port is the same as the local running node.

ERC20_moacwallet12.png
You may see the error message like this:

ERC20_moacwallet17.png
If you see this error message, check the local node that include both
--rpccorsdomain "http://remix.ethereum.org"
and
--rpcport "8545"
If the connection is established, you should see your accounts from the Account List.
ERC20_moacwallet18.png
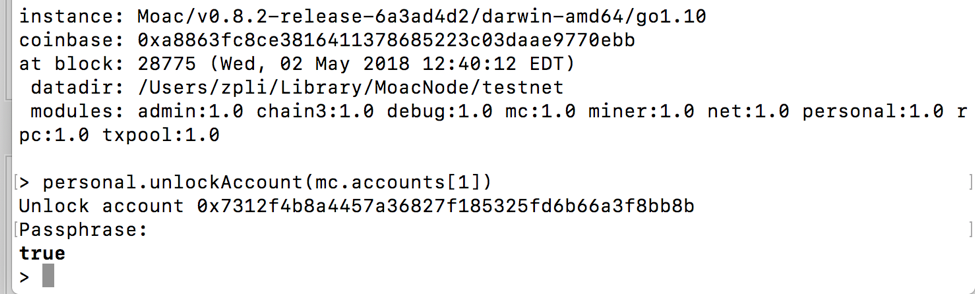
Before you deploy the contract, you need to unlock the account that send the contract. You can do the unlock with the MOAC console:
ERC20_moacwallet09.png
After successfully deployed the contract, you should see the contract address and other information showed in the menu:
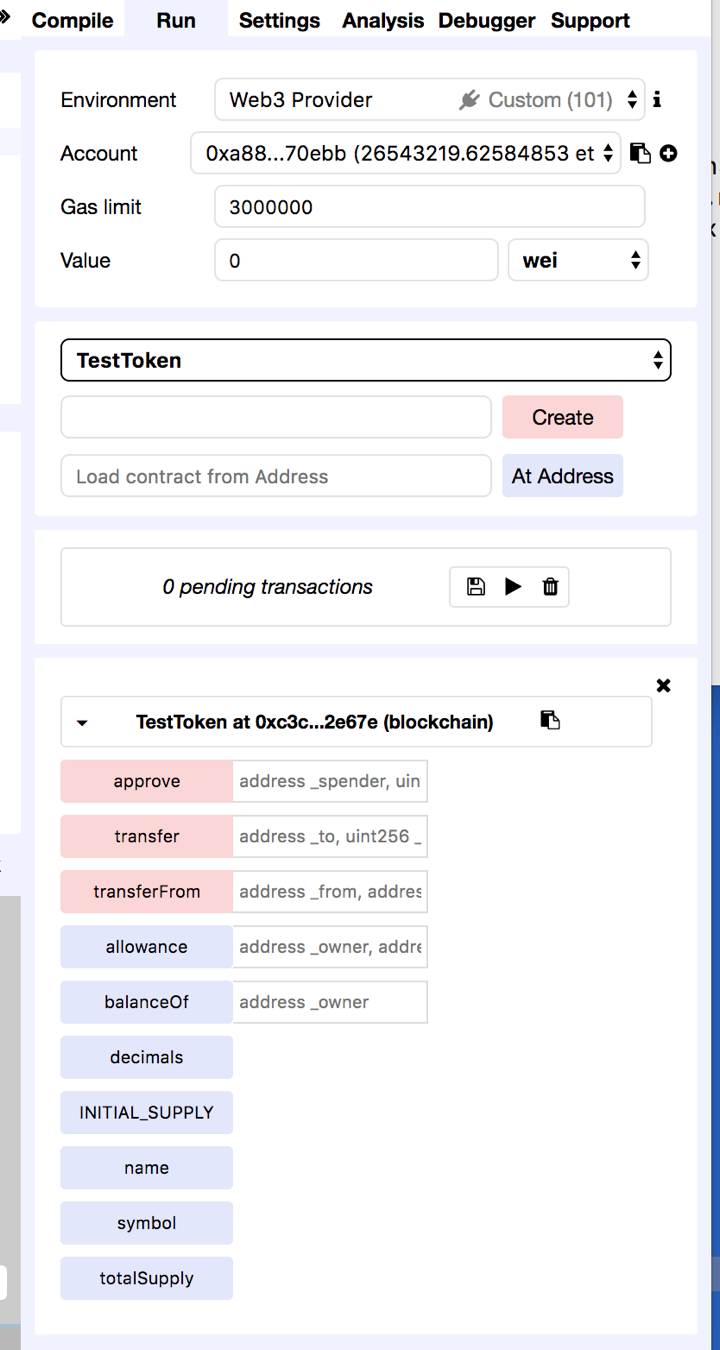
ERC20_moacwallet19.png
Remix is good for developing and debugging smart contracts. It is not very convenient to deploy multiple contracts. If your requires to deploy multiple contracts, you can use the Node.Js packages.
Using the Node.Js packages
You need to install solc package to compile the smart contract, and chain3 package to deploy the contract.
To use the latest stable version of the Solidity compiler via Node.js you can install it via npm:
npm install solc
var solc = require('solc')
var input = 'contract x { function g() {} }'
// Setting 1 as second paramateractivates the optimiser
var output = solc.compile(input, 1)
for (var contractName in output.contracts) {
        // code and ABI that are needed by web3
        console.log(contractName + ': ' + output.contracts[contractName].bytecode)
        console.log(contractName + '; ' + JSON.parse(output.contracts[contractName].interface))
}
To deploy the contracts, you need to install the Chain3 package:
npm install chain3
There is an example file in the package: example/contract_deploy.js
After successfully deploy, you should see the contract is displayed
Succeed!: 0x95d703ea48477f48335ae9c477ce6d986bc68453dfe3d6582714045456b93405
Using solc compiler to generate the ABI and bytecode Another way of generating these two files is to compile your smart contract using the solc compiler on your machine. If you haven’t used solc yet, you can follow these instructions for installing it on your machine.
Open a Terminal window and navigate to your working directory where you have saved your TestToken.sol file. Run the following command to export the ‘TestToken.abi’ and ‘TestToken.bin’ files to the bin directory:
solc --bin --abi -o bin TestToken.sol
As the file extensions suggest, ‘TestToken.abi’ contains your contract’s ABI, and ‘TestToken.bin’ contains its bytecode.
If you prefer accessing the solc compiler from within a program’s code to generate the ABI and bytecode files rather than using the command line, you can use the following code instead:
var fs =  require ( ' fs ' );
var solc =  requires ( 'solc' );

var cmds = process.argv;
if(cmds != null && cmds.length > 2){
  var file = cmds[2];
  var name = cmds[3];
  var content = fs.readFileSync(file).toString();

  was input = {
    file: content
  };

  var output = solc.compile({sources: input}, 1);
  console.log('contracts', Object.keys(output.contracts));

  var ctt = output.contracts[name];
  if(ctt == null){
      return;
  }

  var bytecode = ctt.bytecode;
  var abi = JSON.parse(ctt.interface);

  console.log('bytecode', bytecode);
  console.log('abi', ctt.interface);
}
Regardless of which method you followed, you should now have the ABI and bytecode files for your TestToken smart contract. Next, you will be able to deploy your token contract on the MOAC blockchain for others to interact with it.